ISC 11> PRACTICAL BOOKLET
DIAGRAMS AND OBSERVATION ON THE BLANK PAGE AND WRITTEN MATTER ON THE RULED PAGE.
INDEX
Scientific techniques
1.To study parts of dissecting microscope and compound microscope
Physiology
9. Morphology and modification of roots, stem and leaves
10. Preparation of temporary slides of Mucor / Rhizopus
Cytology
Preparation of temporary slide of
11. Onion peel to study the plant cell
12. Stages of mitosis in onion root tips
13. T.S. of monocot and dicot stem
14. T.S. of monocot and dicot root
Spotting
15. Spotting set 1 –Identification of stained preparation of the following:
1. Liverworts
2. Moss
3. Fern
4. Pinus
5. Mushroom
6. One monocot plant (Bamboo)
7. One dicot plant (Petunia)
8. Sponge
9. Hydra
10. Tape worm
11. Leech
12. Silk worm
13. Rohu fish
17. Spotting set 3-Identification, drawing and comments on following physiological experiment set up.
GUIDELINES FOR WRITING THE JOURNAL
Scientific techniques
1.To study parts of dissecting microscope and compound microscope
Physiology
- Food tests : Test for starch, glucose , sucrose, protein and fats
- To study the effect of heat and thawing on permeability of beet root cells.
- To study the effect of different concentration of alcohol on permeability of beet root cells.
- Demonstration of plasmolysis (using Rhoeo discolour leaf/ Onion bulb)
- Demonstration of osmosis in living plant cells by potato osmoscope.
- Separation of plant pigments from leaves by chromatography
- To study the effect of light intensity on the rate of photosynthesis.
9. Morphology and modification of roots, stem and leaves
10. Preparation of temporary slides of Mucor / Rhizopus
Cytology
Preparation of temporary slide of
11. Onion peel to study the plant cell
12. Stages of mitosis in onion root tips
13. T.S. of monocot and dicot stem
14. T.S. of monocot and dicot root
Spotting
15. Spotting set 1 –Identification of stained preparation of the following:
- Stages of meiosis
- Identification of mammalian blood cells
- Bacteria
- Spirogyra
- Amoeba
- Yeast
1. Liverworts
2. Moss
3. Fern
4. Pinus
5. Mushroom
6. One monocot plant (Bamboo)
7. One dicot plant (Petunia)
8. Sponge
9. Hydra
10. Tape worm
11. Leech
12. Silk worm
13. Rohu fish
17. Spotting set 3-Identification, drawing and comments on following physiological experiment set up.
- Egg osmoscope (Osmosis)
- Thistle funnel (Osmosis)
- Exosmosis in grapes (Osmosis)
- Potato osmoscope (Osmosis)
- Bell jar experiment (Transpiration)
- Unequal transpiration in dorsiventral leaf (Transpiration)
- Ganong’s potometer (Transpiration)
- Transpiration pull (Transpiration)
- To show that O2 is evolved during photosynthesis. (Photosynthesis)
- Moll’s half leaf experiment-CO2 is necessary for photosynthesis. (Photosynthesis)
- Ganong’s photo screen-To show that light is necessary for photosynthesis. (Photosynthesis)
GUIDELINES FOR WRITING THE JOURNAL
- Draw borderlines on all four sides of 1 cm on the blank page.
- Explanation, result or inference to be written on the ruled page.
- Observation table for physiology experiments should be on the blank page.
- In taxonomy experiment, classification (for study of flowers) to be written on Right Hand Side corner of the blank page.
- Draw the diagrams in the middle of the page in such a way that there is enough space for labeling.
- The diagrams should be proportionate.
- Avoid haphazard labeling.
- Arrows of the label should point to the part of the diagram and should not overlap each other.
- On the lab day, you must have the observation note book, practical record book (Journal), HB pencil, pencil eraser, sharpener, scale, a piece of clean & soft cotton cloth.
- Students must wear lab coat while performing the practical.
- Maintain proper working atmosphere in the laboratory.
- Keep your area, instruments and practical record well- arranged and tidy.
- Clean and arrange your area before you leave the laboratory.
________________________________________________________________________________________________________________________________
MICROSCOPE
Scientific Techniques
Some of the most important types of microscopes that used in biology are as follows:
1. Simple microscope 2. Compound microscope 3. Electron microscopes 4. Phase-Contrast microscope 5. Interference microscope.
The simple dissection microscope to advanced electron microscopes finds application in studies of living organisms.
Microscope as the name suggests are instruments that help to enlarge minute (micro = very small) organisms or their parts. A microscope not only presents a magnified view of the object but also ‘resolves’ it better.
Resolution is the feature which makes it possible to differentiate between two points present close together in the objects being viewed. The first microscope was constructed by Anton Van Leeuwenhoek (1632-1723). This, microscope consisted of a single biconvex lens fitted in a small window of a “board” and the object was viewed through it. This was a simple microscope.
After this compound microscope, were developed using combinations of two lenses. Improvements continued, newer and newer’ microscopes were designed and are still being improved.
Resolving Power:
It is the ability of a microscope to show two closely lying points as two distinct points.
Magnification
It is the ratio of the size of the image to that of the object:
A microscope is an instrument which magnifies or enlarges the image of extremely small object
which cannot be seen with naked eyes.
The compound microscope consists of two main parts.
1. Lens systems (optical parts)
2. Mechanical parts.
1. Lens systems (optical parts):
There are three types of lens systems.
i. Eye piece ii. Objective iii. Mirror
i. Eye piece:
Eye piece lies at the top of the body tube. It can be replaced.
They are generally of 5X, 10X, 15X magnification.
ii. Objective:
Objectives are attached to the nose piece.
They are of different magnifications as 10X (low power) and other of high power (45X) and 100X for oil immersion.
The most commonly used objective is 10X.
Condenser:
It consists of condensed lens system which receives the light rays coming from the mirror and converges them at the level of the stage.
iii. Mirror:
It is movable, detachable and fitted below the stage.
It has one concave and one flat surface.
It reflects light upward through the diaphragm.
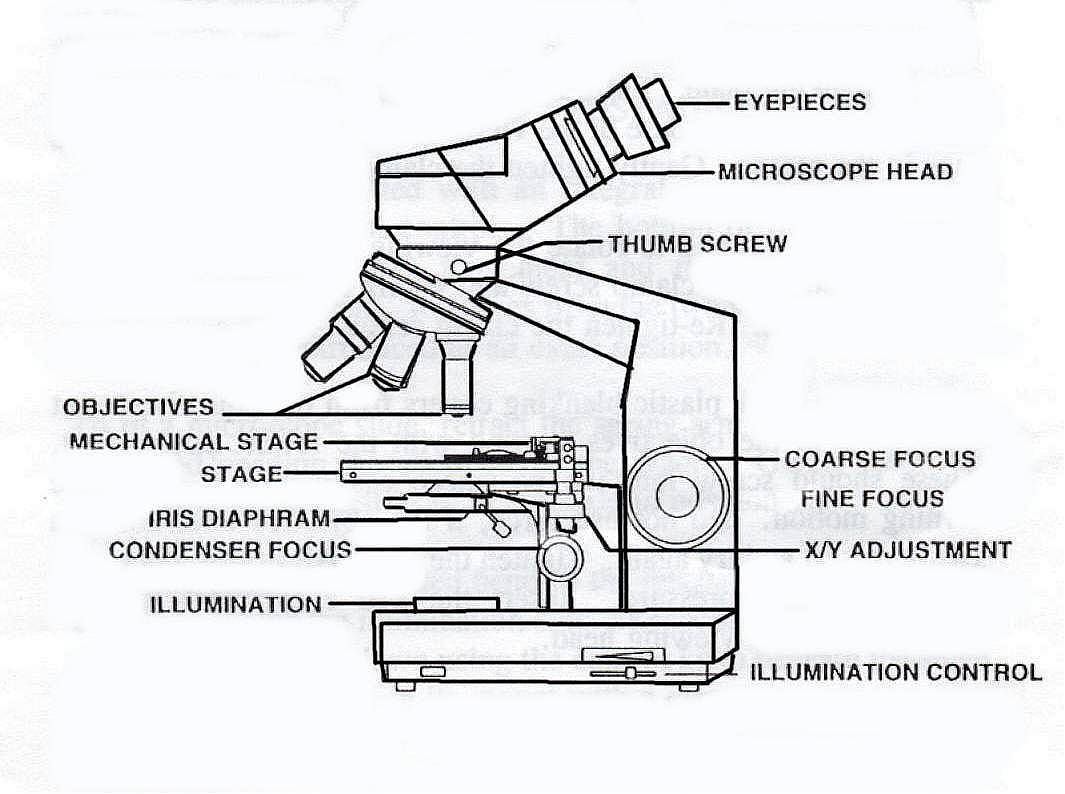
2. Mechanical parts:
Compound microscope is made up of following parts:
i. Base:
It is the lowermost part of microscope. It bears the weight. It is ‘U’ or triangular shaped.
It supports the body of microscope.
ii. Body tube:
It is a body of microscope and made up of tube hence called body tube.
It can move in vertical direction i.e. up and down movement.
It bears two lenses viz. eye piece and objective at suitable distance.
iii. Inclination joint:
It joins the lower and upper parts of microscope. The upper part of microscope can be tilted to suit the eye-level of the observer.
iv.Fine adjustment knob:
It is small - sized screw.
It is attached to the body tube. It moves the body tube up and down and exact focusing can be made.
v. Coarse adjustment:
It is attached to the body tube which can be moved up and down for focussing.
vi. Stage with clips:
It is platform with circular hole in the middle on which slide is placed and fixed withclips.
vii. Nose-piece:
It is a circular metallic structure attached below the body tube.
It is revolving part for the adjustment of objectives. There are three or four objectives fitted in the nose−piece with lens.
viii. Body arm (limb):
It supports the body tube. It is usually curved. It is used to hold the microscope.
ix. Diaphragm:
It is fitted below the stage. It controls the amount of light incident on the condenser lens.
Instructions / Precautions while using the microscope.
i. Place the microscope in maximum diffused light.
ii. Fix first the low power for observation.
iii. Use concave mirror to adjust the light.
iv. Always clean the lenses or mirror with muslin cloth or soft handkerchief.
v. Slide should be clean and dry.
vi. Use diaphragm to adjust proper light.
vii. Do not touch the lens, objective, mirror or diaphragm with hands.
viii. Always observe with both eyes open.
ix. Never leave a slide on stage after use.
x. Hold the microscope with both hands.
- Aim: To study compound microscope and its parts.
Some of the most important types of microscopes that used in biology are as follows:
1. Simple microscope 2. Compound microscope 3. Electron microscopes 4. Phase-Contrast microscope 5. Interference microscope.
The simple dissection microscope to advanced electron microscopes finds application in studies of living organisms.
Microscope as the name suggests are instruments that help to enlarge minute (micro = very small) organisms or their parts. A microscope not only presents a magnified view of the object but also ‘resolves’ it better.
Resolution is the feature which makes it possible to differentiate between two points present close together in the objects being viewed. The first microscope was constructed by Anton Van Leeuwenhoek (1632-1723). This, microscope consisted of a single biconvex lens fitted in a small window of a “board” and the object was viewed through it. This was a simple microscope.
After this compound microscope, were developed using combinations of two lenses. Improvements continued, newer and newer’ microscopes were designed and are still being improved.
Resolving Power:
It is the ability of a microscope to show two closely lying points as two distinct points.
Magnification
It is the ratio of the size of the image to that of the object:
A microscope is an instrument which magnifies or enlarges the image of extremely small object
which cannot be seen with naked eyes.
The compound microscope consists of two main parts.
1. Lens systems (optical parts)
2. Mechanical parts.
1. Lens systems (optical parts):
There are three types of lens systems.
i. Eye piece ii. Objective iii. Mirror
i. Eye piece:
Eye piece lies at the top of the body tube. It can be replaced.
They are generally of 5X, 10X, 15X magnification.
ii. Objective:
Objectives are attached to the nose piece.
They are of different magnifications as 10X (low power) and other of high power (45X) and 100X for oil immersion.
The most commonly used objective is 10X.
Condenser:
It consists of condensed lens system which receives the light rays coming from the mirror and converges them at the level of the stage.
iii. Mirror:
It is movable, detachable and fitted below the stage.
It has one concave and one flat surface.
It reflects light upward through the diaphragm.
2. Mechanical parts:
Compound microscope is made up of following parts:
i. Base:
It is the lowermost part of microscope. It bears the weight. It is ‘U’ or triangular shaped.
It supports the body of microscope.
ii. Body tube:
It is a body of microscope and made up of tube hence called body tube.
It can move in vertical direction i.e. up and down movement.
It bears two lenses viz. eye piece and objective at suitable distance.
iii. Inclination joint:
It joins the lower and upper parts of microscope. The upper part of microscope can be tilted to suit the eye-level of the observer.
iv.Fine adjustment knob:
It is small - sized screw.
It is attached to the body tube. It moves the body tube up and down and exact focusing can be made.
v. Coarse adjustment:
It is attached to the body tube which can be moved up and down for focussing.
vi. Stage with clips:
It is platform with circular hole in the middle on which slide is placed and fixed withclips.
vii. Nose-piece:
It is a circular metallic structure attached below the body tube.
It is revolving part for the adjustment of objectives. There are three or four objectives fitted in the nose−piece with lens.
viii. Body arm (limb):
It supports the body tube. It is usually curved. It is used to hold the microscope.
ix. Diaphragm:
It is fitted below the stage. It controls the amount of light incident on the condenser lens.
Instructions / Precautions while using the microscope.
i. Place the microscope in maximum diffused light.
ii. Fix first the low power for observation.
iii. Use concave mirror to adjust the light.
iv. Always clean the lenses or mirror with muslin cloth or soft handkerchief.
v. Slide should be clean and dry.
vi. Use diaphragm to adjust proper light.
vii. Do not touch the lens, objective, mirror or diaphragm with hands.
viii. Always observe with both eyes open.
ix. Never leave a slide on stage after use.
x. Hold the microscope with both hands.
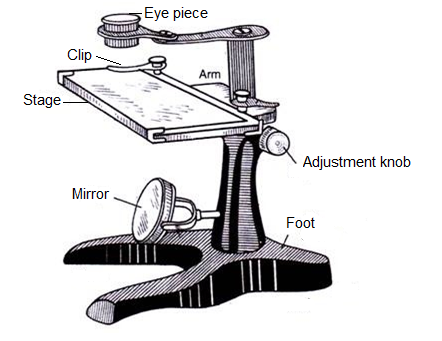
Simple/ Dissecting Microscope:
As shown in the figure, dissecting microscope consists of a biconvex lens which is moved up and down by an adjustment screw to bring the object in sharp focus. The object is placed on the platform and light is focused with the help of a concave mirror fitted below.
In simple microscope, convex lens of short focal length is used to see magnified image of a small object. The object is placed between the optical centre and the focus of a convex lens, its image is virtual, erect and magnified and on the same side as the object.
|
|
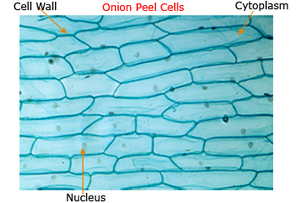
Aim: To Prepare Stained Temporary Mount of Onion Peel
Materials Required: Glass slide, cover slip, watch glasses, dropper, forceps, mounting needle, brush, blotting paper, compound microscope, knife/scalpel, onion, glycerine, safranin solution, distilled water.
Procedure
Precautions:
Materials Required: Glass slide, cover slip, watch glasses, dropper, forceps, mounting needle, brush, blotting paper, compound microscope, knife/scalpel, onion, glycerine, safranin solution, distilled water.
Procedure
- Pour some distilled water into a watch glass.
- Take a piece of onion and with the help of a forcep gently pull a thin, transparent peel (epidermis) front it.
- Put the epidermis in the watch glass containing distilled water.
- Take a few drops of safranin solution into another watch glass.
- Using a brush, transfer the peel into the watch glass containing the safranin solution.
- Let this remain in the Safranin solution for 1-2 minutes, so that the peel is stained.
- Take the peel from the Safranin solution using the brush and place it in the watch glass containing the distilled water.
- Now transfer the peel on a clean slide with the help of a brush and needle. The peel should be placed in the centre of the slide.
Cut the portion of the peel to a proper rectangular or square shape of appropriate size (2 to 3 mm) with the help of a blade and a needle.
Remove the excess of water or stain, if any, from the slide Surrounding the peel with the help of a blotting paper. - Place a drop of glycerine over the peel on a glass slide.
- Take a cover slip and place it gently on the peel with the aid of a needle.
- Remove the extra glycerine using a piece of blotting paper.
- Place this glass side on the stage of the compound microscope.
- Make sure the low objective lens is over the specimen.
- Carefully use the course focusing knob to lower the objective lens to just above the slide.
- Look through the eye piece and carefully use the fine focusing knob to focus the image.
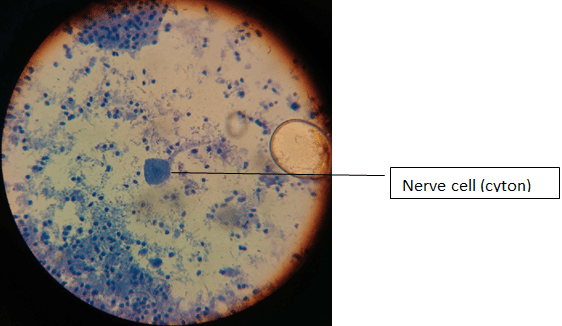
- There are a large number of regularly shaped cells lying side by side and each cell has a distinct cell wall.
- A distinct nucleus is present in the cell.
- Lightly stained cytoplasm is observed in each cell.
Precautions:
- Use a brush to transfer the peel from one apparatus to another.
- Staining of peel should neither be too dark, nor too light.
- Extra glycerine stain should be removed using blotting paper.
________________________________________________________________________________________________________________________________
3 Aim : To make a temporary toluidine blue stained mount of the onion root tip to study various stages of mitosis.
Materials:
Onion root tips, Needles, Brush ,Razor blades, Microscope slides, Coverslips, Microscope, Safety glasses, Gloves, Paper towel, Fixative (1:3 Glacial acetic acid: ethanol), 0.5% toluidine blue, Glycerin
Procedure:
Materials:
Onion root tips, Needles, Brush ,Razor blades, Microscope slides, Coverslips, Microscope, Safety glasses, Gloves, Paper towel, Fixative (1:3 Glacial acetic acid: ethanol), 0.5% toluidine blue, Glycerin
Procedure:
- Obtain an onion bulb that is just beginning to show the emergence of roots. Cut off a root and lay it on a microscope slide. Cut off the first approx 0.5cm of the root tip. Discard the rest of the root. Mitotic cells are in the tip, so extra root tissue will only interfere with finding mitotic cells.
- Cover the root tip with fixative solution; Let the slide stand for 30 minutes to one hour. After some time of placing the tip in fixative solution you will see some part of root become transparent or translucent. Remove that cleared (transparent) part of the root by cutting it off as that part is the region where cells are elongated (Do not show mitotic cell division).Now you would have a very small piece of root tip which may look pale white or dirty white in color (a dot-sized piece of root tip is all you need).
- Carefully blot around the root to remove excess fixative. Add one drop of fresh toluidine blue stain to the slide let the root tip be stained for 2-3 minutes; after that remove or drain the excess stain (you can even use blotting paper for removing the stain).
- Put one drop of glycerin on the stained root tip and then place cover slip over that. Place the slide between two layers of paper towel on your laboratory bench. Using your finger apply gentle pressure to the cover slip in order to squash and spread the root tip tissue. CAUTION: The applied pressure should be such that it does not break the cover slip.
- Using your microscope (10x), locate the meristematic region of the root tip. Examine the slide at 40x magnification and identify chromosomes at the various stages of mitosis.
- Locate cells in prophase, metaphase, anaphase, telophase, and interphase. Look for evidence of cytokinesis. If the slide is not satisfactory, repeat the procedure.
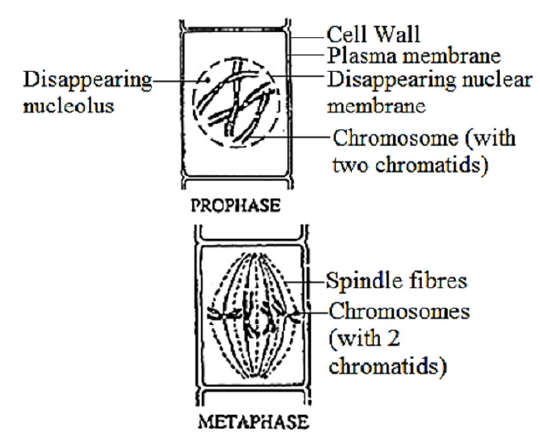
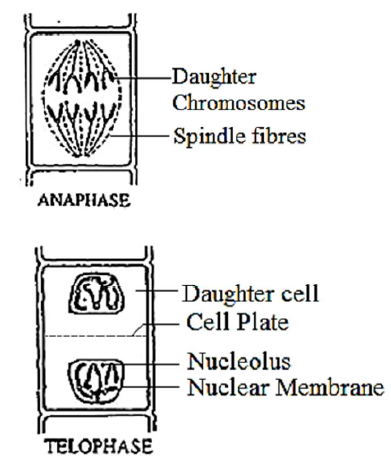
Different stages of mitosis
|
Stages of Mitosis
Interphase It is the non-dividing or resting phase of the cell cycle and is a period of nuclear existence between the successive cell divisions. Comments: Nucleus is large and distinct. Nucleus with distinct nuclear membrane and nucleolus. Chromatin network not distinguished into chromosomes. Prophase Comments: Nuclear membrane and nucleoli disintegrate and disappear by the end of prophase. Chromatin material shortens and condenses into thread like structures called chromosomes. Each chromosome consists of two chromatids jointed at a point called centromere. Metaphase Comments: The two chromatids of each chromosome become shorter and thickened to acquire a specific shape and size. Spindle fibres appear in the cytoplasm between the two centrioles. Centromere of each chromosome lies on the equator and is attached to the spindle fibres. Anaphase Comments: Each centromere divides into two so that each chromatid has got its own centromere. Spindle fibres get attached to the centromere of their side. Chromosomes become V or J shaped depending upon the position of the centromere. Spindle fibres get shortened so that each chromatid with its centromere is pulled apart to its respective pole. At the poles, each chromatid behaves as an independent chromosome. The chromosomes number of daughter nuclei remains the same as of the parent nucleus. Telophase Comments: Chromosomes form the chromatin network. Nucleolus and nuclear membrane reappear again and two daughter nuclei are formed. The two daughter nuclei formed are identical to the parent nucleus. In plant cells, cell plate extends on either side to form middle lamella. It divides the cell cytoplasm into two daughter cells. In animal cells, a cleavage furrow appears in equatorial region and gradually divides to form two daughter cells. |
| mitosis.docx |
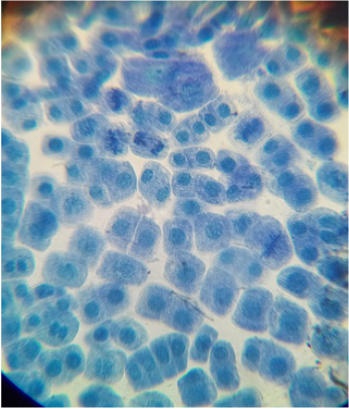
slide showing stages of mitosis
|
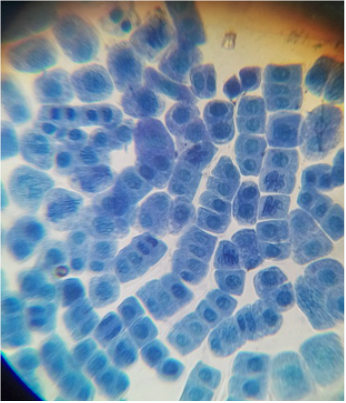
slide showing stages of mitosis
|
__________________________________________________________
BOOKLET 2 (FOOD TESTS)
Cell membrane permeability
Aim: To demonstrate the effect of heat and thawing on permeability of cell membrane of beet root cells.
Material required: test tubes, test tube caps, cork borer, water bath, thermometer, ice cubes, large fresh beet roots, glass marking, scale, sharp blade, measuring cylinder/syringe.
Procedure:
1. Select fresh large beet root and wash it under running water.
2. Cut cylinders of beet root with the help of the cork borer.
3. Cut each cylinder 1.0 cm long with the help of a sharp blade/scalpel. Both the edges should be cleaned.
4. Prepare 12 such beet root discs. All discs should be of same length and width.
5. Wash them in running water to remove the injured cells otherwise the red pigment betacyanin from such cells comes out and deviate the results.
6. Take four clean tubes and mark them as A, B, C and D with the glass marking pencil.
7. Put 5 ml of distilled water in each tube, and put 3 beet root discs in each.
8. Cover the tubes with caps or aluminum foil and place them at the following different temperatures:
a) Test tube at room temperature :A
b) Test tube at 60 degree C in water bath: B
c) Test tube at 95 degree C in water bath: C
d) Test tube in freezing mixture of ice and salt in a beaker at 0 degree C : D
9. Observe the leaching of pigments in these tubes after 15 minutes.
10. Compare the anthocyanin colouration in tubes B, and C and D with that of A.
11. Record your observation as in table 1.
Observations:
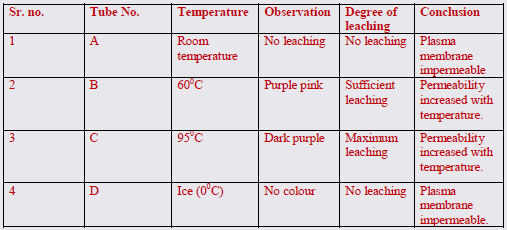
The observation table shows that at room temperature and also at 00C there is no leaching of the pigment. At 500C there is sufficient leaching giving the purple pink colour. At 950C there is maximum leaching giving dark colour in the same interval of time. Since the experiment is a qualitative one, the intensity of colouration can be adjusted on the basis of control experiment.
Discussion:
Beet roots contain betacyanin pigment dissolved in the cell sap. The vacuoles of these cells retain the pigment because these are enclosed by the living tonoplast, the vacuolar membrane. While preparing the discs the plasma membrane of several cells is damaged. Hence some leaching of the pigment takes places. This pigment can be washed out by placing the discs under tap water for 5-10 minutes. When the discs are kept at high temperature, the permeability of the cell membrane is affected. High temperature damages the membrane and the pigment leaches out in water.

Inference
High temperature kills the cells thereby making the cells to lose pigment. The leaching of pigment is maximum at high temperature.
Precautions
1. Beet root discs should be of equal length and width.
2. The edges of discs must be leveled by a sharp blade.
3. Injured cells on the side of discs should be washed under running water.
4. The number of beet root discs should be same in all tubes.
5. Volume of water or chemicals should be the same in all the tubes.
________________________________________________________________________________________________________________________________
Aim: Effect of different concentrations of alcohol on cell membrane permeability
Material required: Test tubes, measuring cylinder, dropper, beaker, distilled water, 100% alcohol, scalpel, ruler, and colorimeter
Procedure
Observation table:
Material required: Test tubes, measuring cylinder, dropper, beaker, distilled water, 100% alcohol, scalpel, ruler, and colorimeter
Procedure
- Take 4 test tubes, label them as A, B, C, D and take 6 ml of water in test tubes B, C, D each.
- Add 6 ml of alcohol in tube A and B each. Tube B now contains 12 ml of mixture. Mix well in tube B and then transfer 6 ml of this mixture to tube C. So tube B now contains 50% alcohol.
- Mix well and discard 6 ml from tube C. This is 25% alcohol.
- Do not add anything except water (6 ml) in tube D. This will be 0% alcohol.
- Cut the cylinders of beetroot into thin discs of about 5 mm thick.
- Rinse the beetroot discs in tap water to wash off pigment that leaked out as a result of cutting.
- Blot dry the discs with blotting paper.
- Put equal number of discs into tubes A to D for e.g. 4 discs in each. Cover the tubes with caps.
- Shake the tubes occasionally.
- After 20 minutes, take out all discs from tubes.
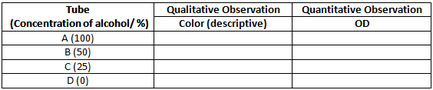
- Record and compare the colour intensity of the solutions in tubes A, B, C, D in table given. These will be the qualitative observations.
- Take optical density reading of each of the tubes using colorimeter at 450 nm using blue filter (measure blue absorbance of the solution). Record your readings in observation table.
- Plot a line graph of the quantitative readings you obtained (OD Vs Concen. of alcohol)
Observation table:
|
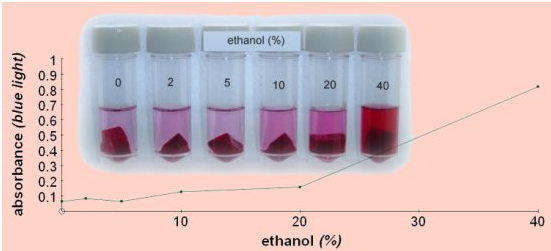
The given picture is just for your reference.
|
Conclusion: Organic solvents at high concentrations can dissolve lipids and thus how severely destroy membrane which leads to leaching of cellular pigment out of the cell.
________________________________________________________________________________________________________________________________
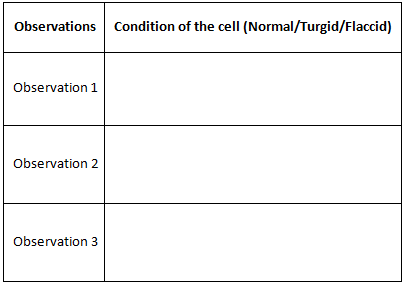
5 Aim: To demonstrate the process of plasmolysis(using Rhoeo discolor leaf/ onion bulb)
Materials required:
Onion bulb, watch glass, petri dish, slides, cover slips, forceps, brush, needles, microscope, water and 50% concentrated sucrose solution.
Procedure:
Materials required:
Onion bulb, watch glass, petri dish, slides, cover slips, forceps, brush, needles, microscope, water and 50% concentrated sucrose solution.
Procedure:
- Take an onion bulb/ rhoeo leaf, with the help of forceps pull a thin transparent peel.
- Keep this peel in water filled watch glass.
- Transfer the peel gently on a clean slide in a drop of water with the help of a brush and needle.
- Examine it under high power (40X) of a light microscope.
- Observe the individual cells note down the observation in the table 1.(Observation 1)
- With the help of dropper put the sucrose solution on the side of the cover slip so that it reaches the peel under the cover slip.
- Examine the peel after 10 minutes and note down the observation in the table 1. (Observation 2)
- Drain out the concentrated sugar solution from the peel and add few drops of water into the peel.
- Observe the cells again after 10 minutes and note down the observation in table 1.(Observation 3)
- Make a sketch of the cell showing the cell wall and cell membrane during all the three observations.
|
|
Explanation:
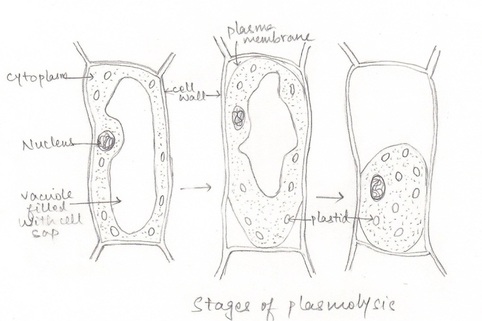
- Observation1: When the peel of onion is kept in a drop of water (isotonic solution), there is no observable change in cells.
- Observation2: When the peel of onion is kept in concentrated solution (hypertonic), the protoplasm shrinks as the water starts moving out due to exosmosis.
- This phenomenon of shrinkage of protoplasm when the cells are kept in a concentrated solution is known as plasmolysis.
- Observation 3: Further, when the cells are kept in water (hypotonic solution) the protoplasm again regains its original shape due to movement of water into the cells by the process of endosmosis. This phenomenon is called deplasmolysis.
Precaution:
- Always use a brush to transfer the peel.
- The peel should be cut to a proper size and its curling must be avoided.
|
________________________________________________________________________________________________________________________________
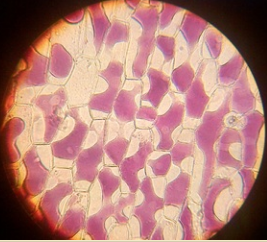
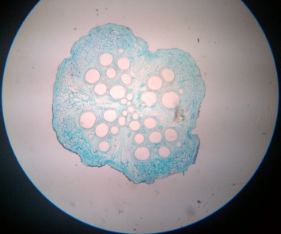
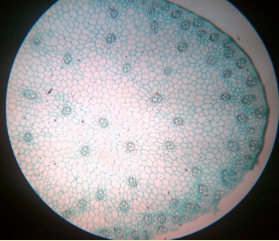
T.S. of Monocot Root
|
T.S. of Dicot Root - Primary growth
|
T.S. of Dicot Root - Secondary growth
|
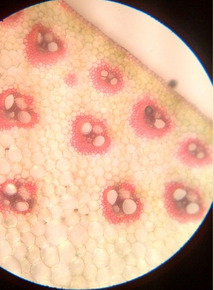
T.S. of Monocot stem
|
T.S. of Monocot stem
|
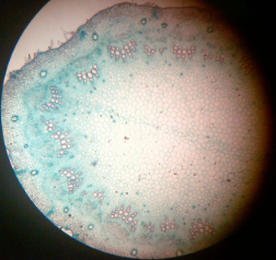
T.S. of Dicot stem
|
________________________________________________________________________________________________________________________________
SPOTTING
__________________________________________________________
TEMPORARY SLIDE PREPARATION OF FUNGI
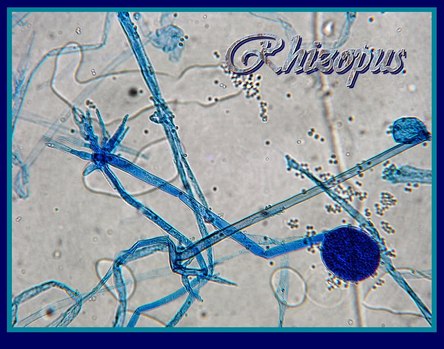
Aim: To study the technique of culture, staining,mounting and then observation under the microscope of Rhizopus.
Material required: Bread, bell jar, slides, coverslips, glycerin, forceps, brush, needle, etc.
Study of Rhizopus
Culture
Place a piece of moist bread under a bell jar at room temperature for 2-3days. After 2 days, the surface of bread piece is covered with white or colourless cottony threads. After a few days upright branches with black tips are developed.
Slide preparation
Study of Rhizopus
Culture
Place a piece of moist bread under a bell jar at room temperature for 2-3days. After 2 days, the surface of bread piece is covered with white or colourless cottony threads. After a few days upright branches with black tips are developed.
Slide preparation
- Pick up few threads along with upright branches with the help of forceps and needle.
- Stain by using of lactophenol and put them on the slide in a drop of glycerin.
- Cover with the coverslips and observe under the microscope.
|
Rhizopus under microscope
|
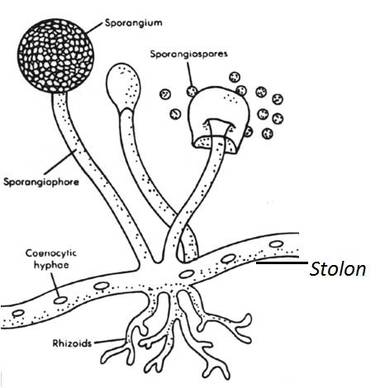
Rhizopus : Diagrammatic
|
Comments
- The fungal body is interwoven mass of white cottony threads, is known as mycelium.
- Young hyphae are branched, coenocytic (multinucleate) and aseptate.
- Three types of hyphae recognised in the mycelium are A) Stolons B) Rhizoids C) Sporangiophores
- Cell wall is made up of chitin.
- Food is stored as glycogen.
PHOTOSYNTHESIS
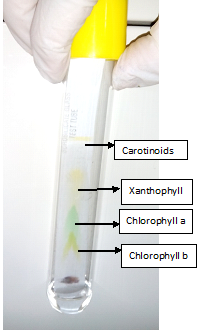
7 AIM: Separation of plant pigments by paper chromatography.
Material required:
Spinach leaves, coin, chromatography paper, pre-saturated chromatography chamber, pencil, petroleum ether and acetone.
Procedure:
Record your result in given table.
Material required:
Spinach leaves, coin, chromatography paper, pre-saturated chromatography chamber, pencil, petroleum ether and acetone.
Procedure:
- Obtain a chromatography paper strip, take care that you are holding the paper either from the top or from sides.
- Cut the chromatography paper of required length with one pointed end.
- Leaving about 2-3 cm form pointed end draw a faint horizontal line with pencil.
- This line is your origin line or base line.
- Get chlorophyll pigment by scrapping of rolling a coin over the given leaf about 10-15 times. Keep on rolling till you get a heavy green colored line on the edge of coin.
- Transfer that pigment on the line which was drawn on the chromatography paper.
- Let it be dried, by the mean time obtain a large test tube which is saturated with solvent system (9:1 petroleum ether: acetone).
- Put your chromatography strip in to that saturated tube in such a way that no edge of paper should touch the inner side of glass tube and then close the tube.
- Solvent in the tube will start rising up, when solvent reaches 2/3 of paper length remove paper form chromatography chamber and immediately draw a line where solvent has reached. This will be your solvent front.
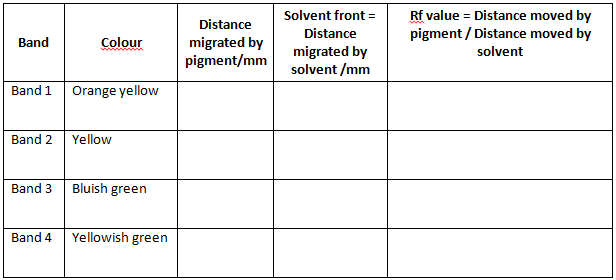
- On drying four different coloured zones appear, indicating four distinct pigment bands. This is chromatogram. The chromatogram would contain four different bands of different colours, starting from base line
- Chlorophyll b yellowish green
- Chlorophyll a bluish green
- Xanthophyll yellow
- Carotene orange yellow
- Mark the bottom of each pigment band. Measure the distance travelled by each pigment from base line to the bottom of the separated pigment band. The relationship of the distance moved by a pigment to the distance moved by the solvent is a constant called Rf. It can be calculated for each of the four pigments using the following formula:
Record your result in given table.
|
|
Inference:
- The green leaves contain four pigments namely chlorophyll a, chlorophyll b, xanthophyll and carotene.
- Before inserting the extract loaded paper strip, the air inside the test tube should be saturated with fumes.
- The loading spot should be placed 2-3 cm away from the tip of the notch.
- The paper strip should not touch the walls of the test tube.
________________________________________________________________________________________________________________________________
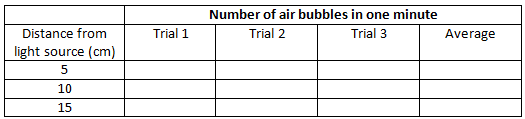
8 Aim: To study the effect of light intensity on the rate of photosynthesis using aquatic plant.
Material required:
Beaker, funnel, test tube, watch/clock, Table lamp, scale, scissors, sodium bicarbonate and fresh
twigs of Hydrilla/Vallisneria/Ceratophyllum/Eichhornia/Nymphaea etc.
Procedure:
The number of air bubbles evolved per minute from Hydrilla plants at different distances from light source.
Observation:
The rate of evolution of bubbles varies with distance.
Result: The rate of photosynthesis decreases with increase in the distance from light source.
PRECAUTION :
• Twigs should be placed such that their cut ends are towards the stem of the funnel.
• Fresh Hydrilla to be used.
• Hydrilla twigs should be obliquely cut.
Material required:
Beaker, funnel, test tube, watch/clock, Table lamp, scale, scissors, sodium bicarbonate and fresh
twigs of Hydrilla/Vallisneria/Ceratophyllum/Eichhornia/Nymphaea etc.
Procedure:
- Take a known amount of actively photosynthesizing Hydrilla plants in a beaker full of water.
- Keep a funnel inverted over the plants. Keep plants in such a way that all the cut ends of the twigs face upwards.
- Keep a test tube full of water inverted on the funnel.
- Keep the experimental set up in front of table lamp at the distance of 5cm & switch on the table lamp.
- When bubbles appear, count the number of bubbles for one minute. Record this number in observation table. Take 2 more trials and record.
- Now repeat the above step by keeping the table lamp at the distance of 10cm & 15cm & count the number of bubbles produced in every minute for 3 minutes. Record in a table.
- Calculate the average number of bubbles produced for each distance and record in a table.
- Plot a graph between numbers of bubbles evolved per minute from Hydrilla plants for different distances.
The number of air bubbles evolved per minute from Hydrilla plants at different distances from light source.
Observation:
The rate of evolution of bubbles varies with distance.
Result: The rate of photosynthesis decreases with increase in the distance from light source.
PRECAUTION :
• Twigs should be placed such that their cut ends are towards the stem of the funnel.
• Fresh Hydrilla to be used.
• Hydrilla twigs should be obliquely cut.
________________________________________________________________________________________________________________________________
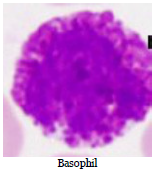
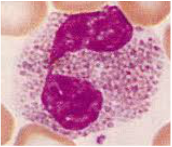
Identification of Blood cells from prepared slides
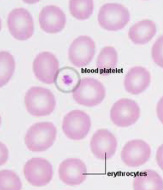
Red blood cells
|
|
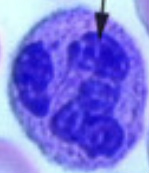
Neutrophill
|
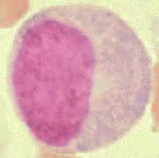
Lymphocyte
|
Eosinophil
|
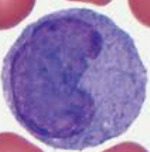
Monocyte
|
Leaf Morphology
______________________________________________________________________________________________________________________________
Slide prepared by students (2016-17)