ISC 11> PRACTICAL> 1.TOOLS IN BIOLOGY
|
Dissecting microscope, compound microscope, electron microscope.
A brief idea of compound microscope, electron microscope with relation to magnification and resolution power. |
|
How big are cells?
How did the invention of microscope change science.....Biology?
This will be a class discussion.
Link 1
Link 2
This will be a class discussion.
Link 1
Link 2
Microscopes in use
Dissecting microscope
|
Compound microscope
|
Electron microscope
|
PROPERTIES OF MICROSCOPE-
1. MAGNIFICATION- It is the amount or degree to which the object being viewed is enlarged.
2. RESOLVING POWER- The ability to render two closely located points separately.
Further reading-
Link 3
Link 4
1. MAGNIFICATION- It is the amount or degree to which the object being viewed is enlarged.
2. RESOLVING POWER- The ability to render two closely located points separately.
Further reading-
Link 3
Link 4
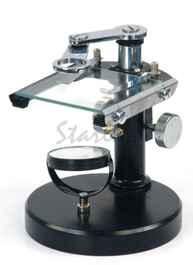
DISSECTING MICROSCOPE-
It consists of a biconvex lens which is moved up and down by an adjustment screw, to bring the object in sharp focus. The light is focussed with the help of a concave mirror fitted below. A magnified image of the full object can be seen through it.
It consists of a biconvex lens which is moved up and down by an adjustment screw, to bring the object in sharp focus. The light is focussed with the help of a concave mirror fitted below. A magnified image of the full object can be seen through it.
|
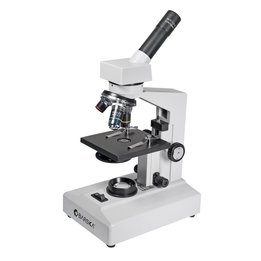
COMPOUND MICROSCOPE-Compound microscope is a combination of two simple microscopes.
It has two lenses – objective and the eye piece. Total magnification is equal to initial magnification of the objective multiplied by magnification of eye-piece. This is the oldest, simplest and most widely-used form of microscopy. Specimens are illuminated with light, which is focused using glass lenses and viewed using the eye or photographic film. Specimens can be living or dead, but often need to be stained with a coloured dye to make them visible. Many different stains are available that stain specific parts of the cell such as DNA, lipids, cytoskeleton, etc. All light microscopes today are compound microscopes, which means they use several lenses to obtain high magnification. Light microscopy has a resolution of about 200 nm, which is good enough to see cells, but not the details of cell organelles. Binocular light microscope is a type of the light microscope which uses two eyepieces. |
|
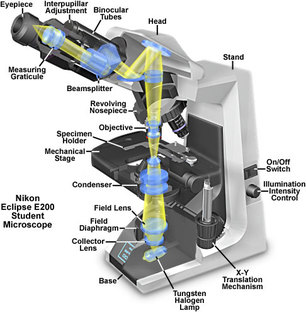
Parts of a microscope
The parts of a compound microscope can be categorized into two groups: mechanical parts and optical parts.
Mechanical parts: A compound microscope has following mechanical parts:
The objective lens produces an initial image of the object which is magnified by the ocular lens and the final image is produced.
The condenser directs the light on the specimen with the help of mirror.
Activity link-
Labelthemicroscope
Further reading
Link 5
The parts of a compound microscope can be categorized into two groups: mechanical parts and optical parts.
Mechanical parts: A compound microscope has following mechanical parts:
- Base or foot of the microscope: it supports the body of the microscope.
- Pillar: It is small vertical portion from the base.
- Arm: It is usually curved and used for handling the instrument.
- Inclination joint: At this point the arm is attached to the pillar. The microscope can be tilted at this joint.
- Stage: It is a kind of platform having a circular hole in the middle which admits light from the mirror below.
- Stage clips: The stage is fitted with the spring clips or sliding bars. These hold the glass slide firmly
- Diaphragm: It is attached to the base of the stage and regulates the amount of light entering into the microscope. It is of two types: disc diaphragm and iris diaphragm.
- Body tube: It carries two lenses, i,e objective and eye piece at the working distance from each other.
- Nose piece: It is a circular metallic structure attached below the body tube. In it the objective lens is fitted.
- Coarse adjustment: It is attached to the body tube which can be moved up and down for focusing.
- Final adjustment: It is a small sized screw used for fine and sharp focusing.
- Mirror: It is attached to the arm below the stage. It is used for reflecting light rays into the microscope.
- Objective lenses: These are attached to the nose piece. Usually two objective lenses are provided with 10x and 45x magnification.
- Eye or ocular lens: This lens is fitted at the top of the body tube through which magnification image of the object is seen. It has a magnification of 10x or 45x.
The objective lens produces an initial image of the object which is magnified by the ocular lens and the final image is produced.
The condenser directs the light on the specimen with the help of mirror.
Activity link-
Labelthemicroscope
Further reading
Link 5
Handling the microscope
When you pick up the microscope and walk with it, grab the arm with one hand and place your other hand on the bottom of the base.
DON'T SWING THE MICROSCOPE !
Avoid touching the lens with your hands.
When you are finished with your "microscope" assignment, rotate the nose-piece so that it's on the low power objective, roll the nose-piece so that it's all the way down to the stage, then replace the dust cover.
Clean all slides, materials, and work area when you're done. Place all the materials back in proper places as conveyed by the laboratory technicians.
Using the microscope
The specimen or object should be observed using the LOW POWER lens first.
Focus in the low power by adjusting the COARSE ADJUSTMENT KNOB to bring the object into focus. Now use the fine adjustment knob to get a sharp focus.
If required, now focus, and then move to a higher power objective.
Use only the FINE ADJUSTMENT KNOB when using the HIGH POWER OBJECTIVE.
Keep both eyes open to reduce eyestrain. Keep eye slightly above the eyepiece to reduce eyelash interference.
LIGHT MICROGRAPHS
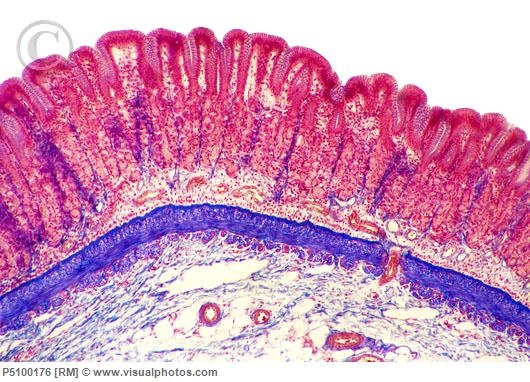
STOMACH LINING
|
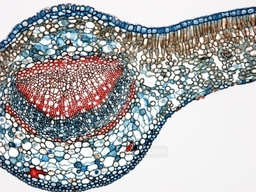
T. OF DICOT LEAF
|
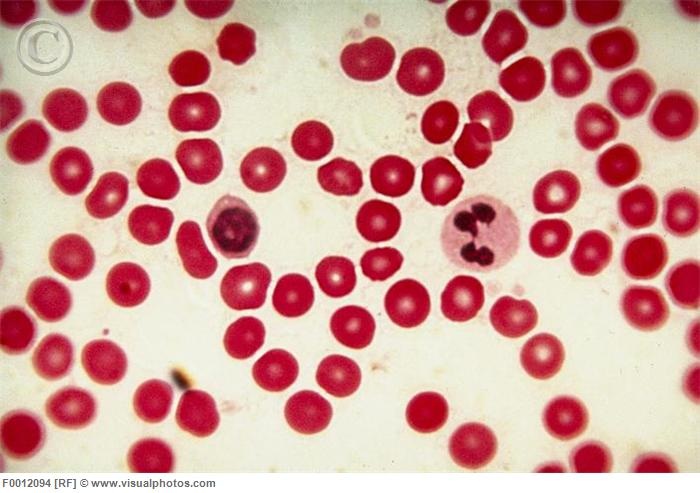
HUMAN BLOOD CELLS
|
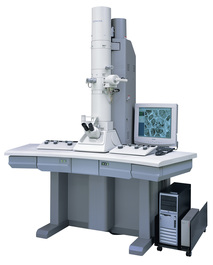
ELECTRON MICROSCOPE
- Designed by Knoll and Ruska.
- High speed electrons of short wave length are used as illuminating agents instead of light rays.
- Electromagnetic condenser lens- collects and condenses electrons on the object.
- Electromagnetic objective lens- focuses the electrons reflected by the object and forms the first image.
- Electromagnetic projector lens- forms the final image.
|
PARTS OF ELECTRON MICROSCOPE
|
|
Transmission electron micrographs
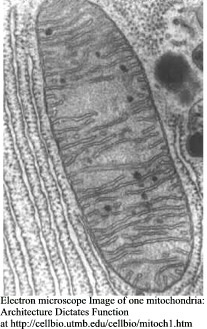
mitochondria
|
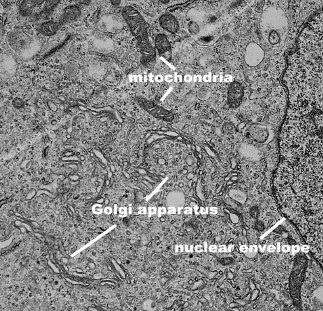
golgi apparatus
|
chloroplast
|
Scanning electron micrographs
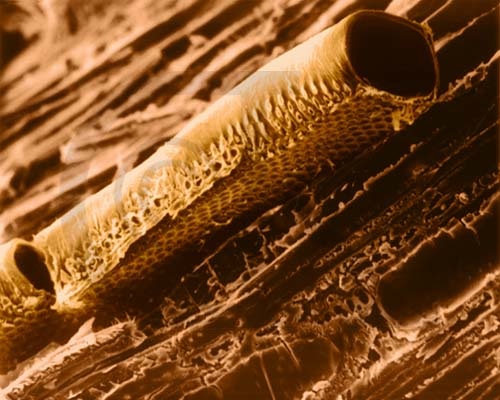
XYLEM VESSEL
|
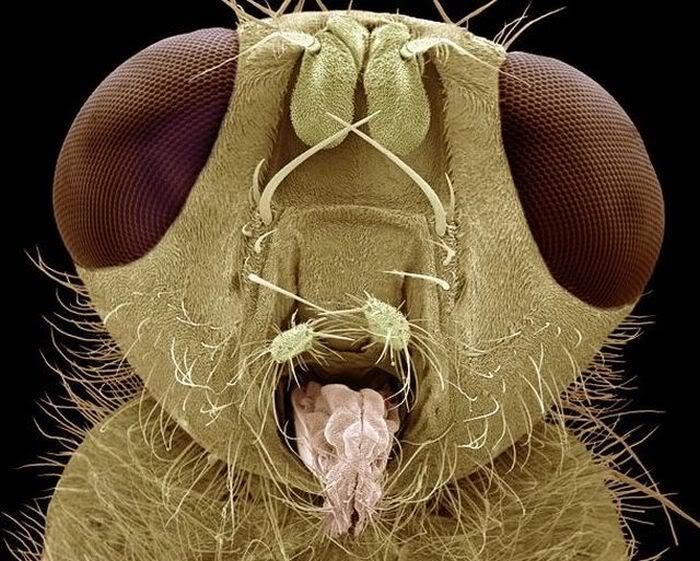
INSECT HEAD
|
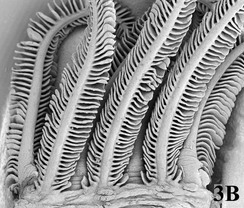
FISH GILL
|
| LIGHT MICROSCOPE | ELECTRON MICROSCOPE | |
|---|---|---|
| radiation used | light rays | electron beams |
| magnification | x2000 | x500 000 |
| resolving power | 200nm | 1nm |
| focussed by | glass lenes | electromagnets |
| material | living or dead | dead |
| size of the microscope | small and portable | Huge and static |
| cost | relatively cheap | very expensive |
Reference
|
Assignment
| ||||
Assignment submission
Download the assignment document and rename the document with your name.
Put a footer with your name in the document.
This assignment has to be submitted by 9TH April 2014 by 4.00 pm.
Put a footer with your name in the document.
This assignment has to be submitted by 9TH April 2014 by 4.00 pm.
