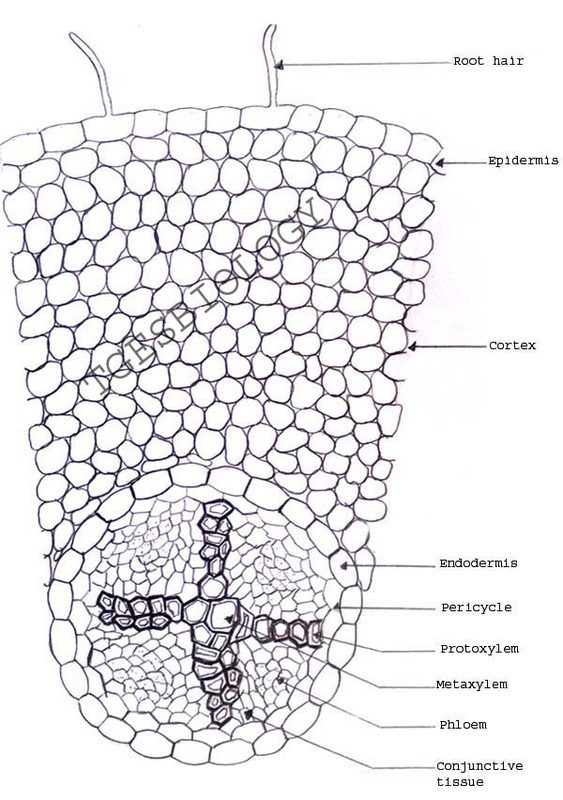
ISC-12>PRACTICAL>SLIDE PREPARATION>PLANT ANATOMY
SLIDE PREPARATION OF STEM AND ROOT
Aim: To prepare temporary stained glycerine mounts of transverse sections of stem and root of Dicot and Monocot plants.
Material required: Sharp razor, brush, dropper, needles, watch glass, microscopic slides, cover-slips, safrannin, glycerine and compound microscope.
Technique:
Study under the microscope: Focus the slide under lower of microscope and then change to high power if needed
Precautions:
Material required: Sharp razor, brush, dropper, needles, watch glass, microscopic slides, cover-slips, safrannin, glycerine and compound microscope.
Technique:
- Take 2-3cm long pieces of the material.
- Hold the material between thumb and first finger of your left hand.
- Hold the razor in the right hand with edge of the blade facing you and handle at right angle to it.
- Dip the top of the material in water.
- Then start cutting transverse sections as fast as possible in a watch glass containing water.
- Select the thinnest section of the material with the help of a delicate brush.
- Take a clean watch glass with water, transfer thin sections of the material.
- Put a few drops of saffranin stain in the watch glass with water.
- Leave it for 3-5 minutes.
- Drain off stain and wash with water if necessary.
- Put the thinnest section in the centre of the slide.
- Put a drop of glycerine over the material.
- Cover it with a coverslip with the help of needle.
- Observe it under a compound microscope after staining and mounting.
Study under the microscope: Focus the slide under lower of microscope and then change to high power if needed
Precautions:
- Safranin is to be used to stain only the lignified tissues, over staining can be removed by washing in water.
- Air bubbles must be avoided in the sections.
- Use only brush to transfer or to handle the sections. Do not use needles for this purpose.
- Discard the incomplete and oblique sections.
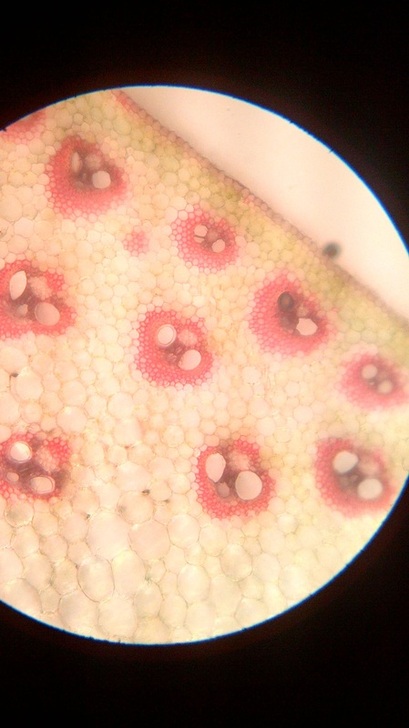
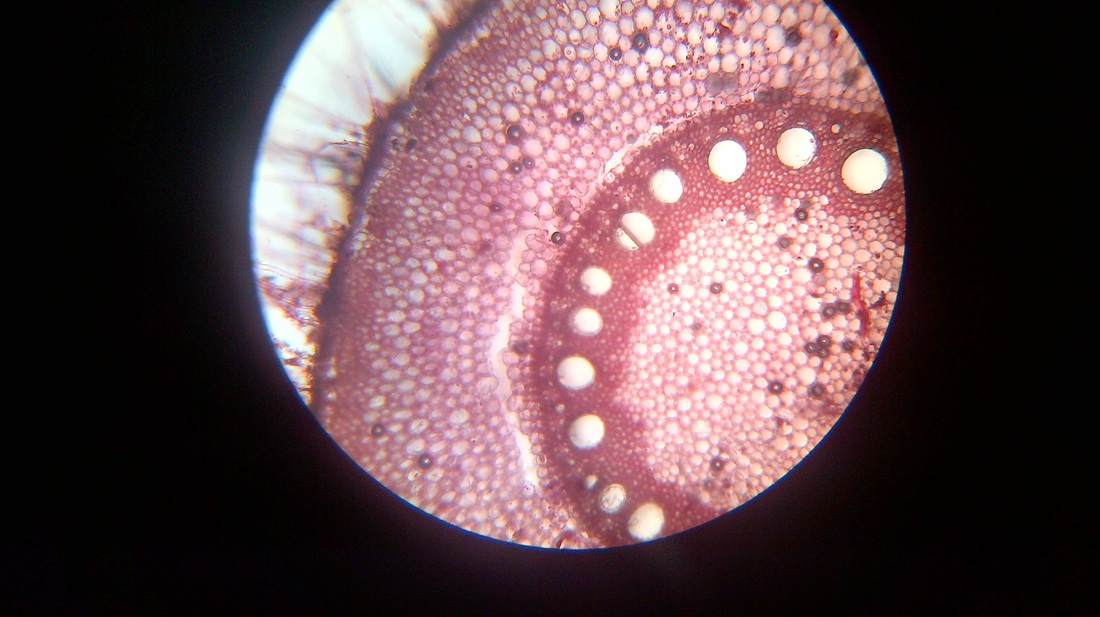
A. Temporary slide preparation of Dicot stem
Identifying characteristics-
Inference: The given specimen is the section of dicot stem.
- Multicellular hair present on the epidermis.
- Hypodermis collenchmatous.
- Xylem endarch (metaxylem towards periphery and protoxylem towards centre)
- Vascular bundles are arranged in a ring.
- Vascular bundles conjoint, collateral and open.( cambium present)
Inference: The given specimen is the section of dicot stem.
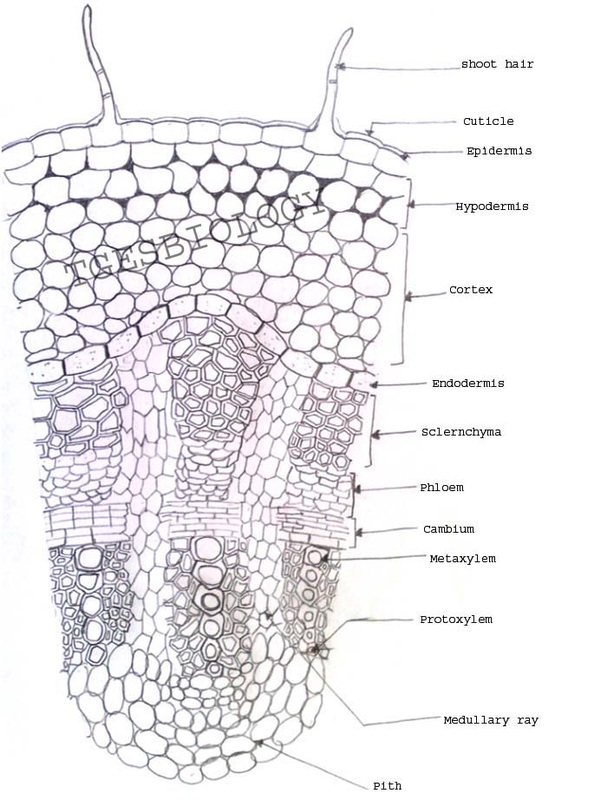
T.S of dicot stem (for drawing)
|
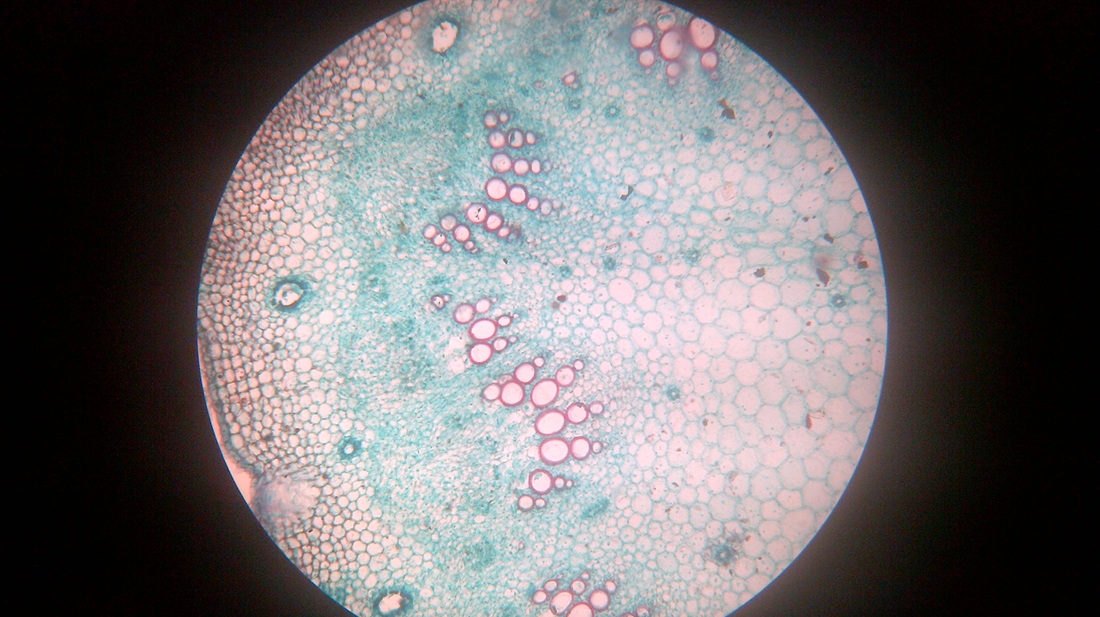
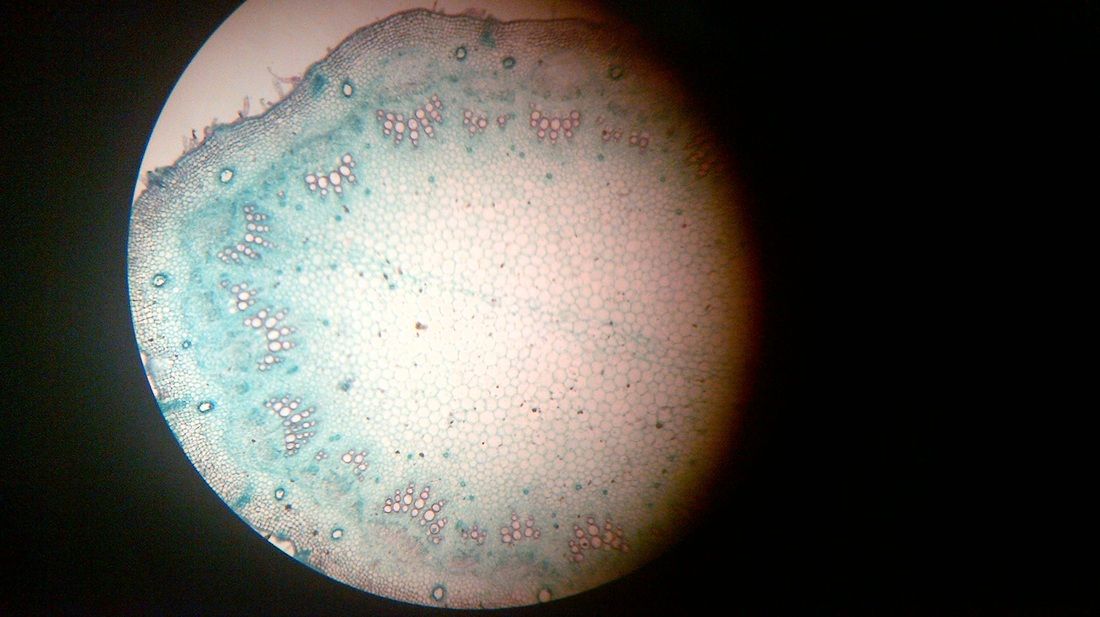
T.S of dicot stem as seen under microscope.
|
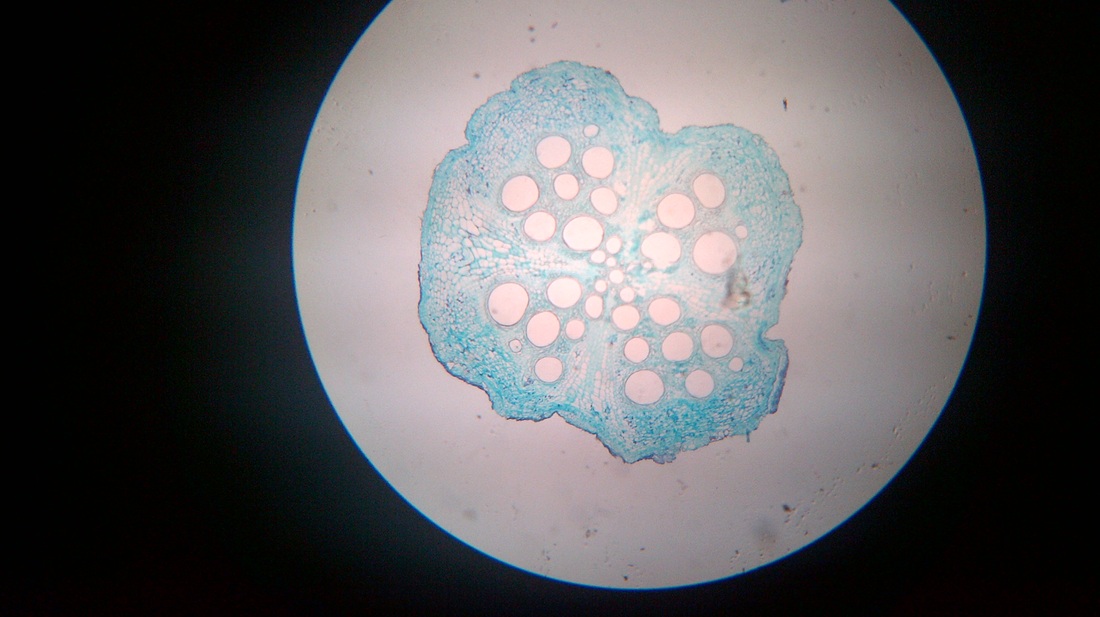
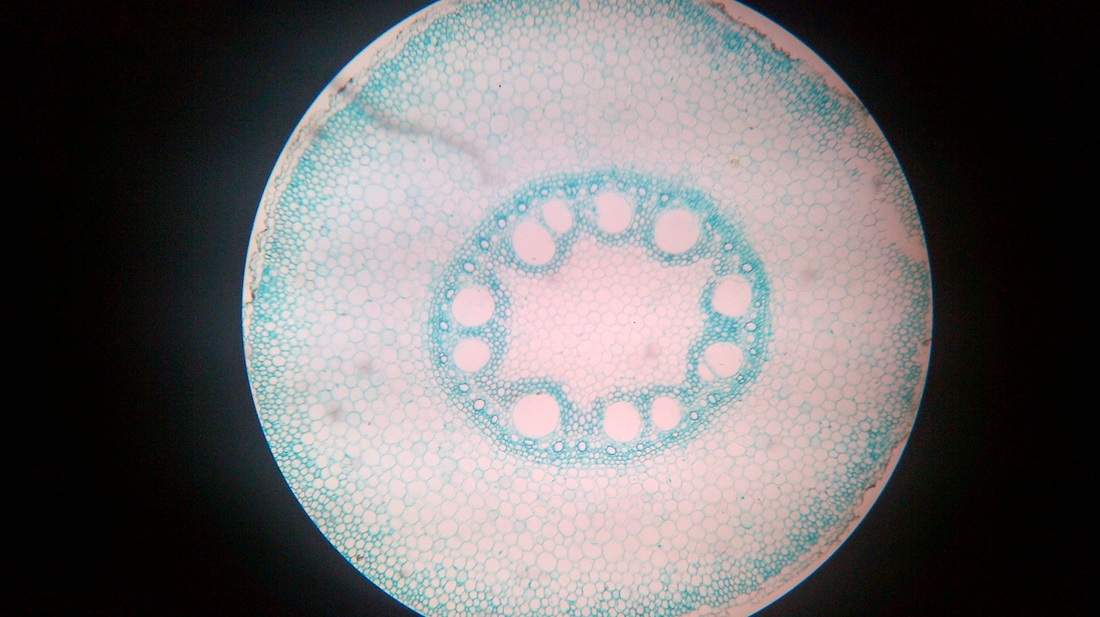
B. Temporary slide preparation of monocot stem
Identifying characteristics-
Inference: The given specimen is the section of monocot stem.
- Hypodermis is sclerenchymatous.
- Cortex is not differentiated into endodermis and pericycle.
- Vascular bundles are scattered in the ground tissue.
- Vascular bundles are conjoint,collateral and closed, i.e cambium is absent.
- Each vascular bundle is surrounded by a bundle sheath.
- Xylem is y-shaped and metaxylem lies towards periphery.
Inference: The given specimen is the section of monocot stem.
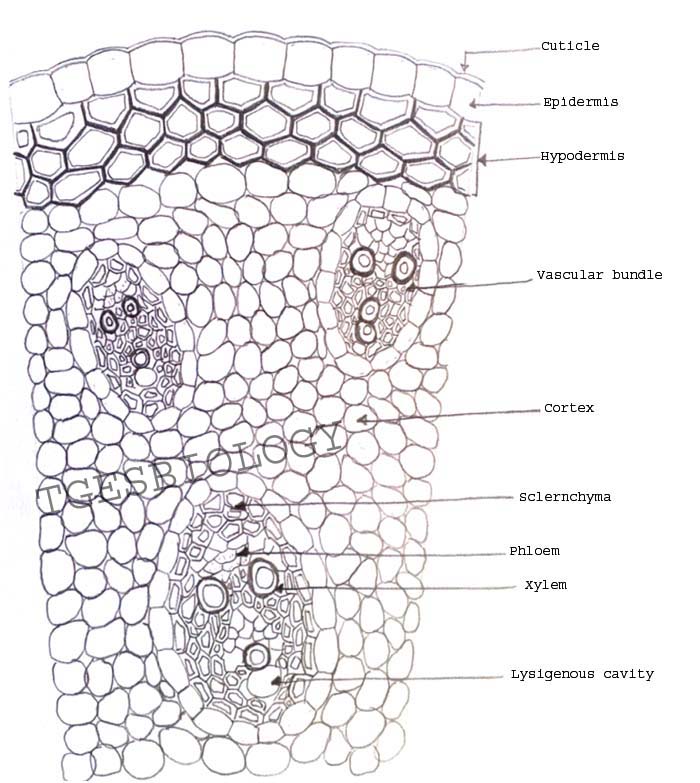
Above:- T.S of monocot stem (for drawing)
below: Section of monocot stem as seen under microscope 
|
Section of monocot stem as seen under microscope with details of vascular bundles
|
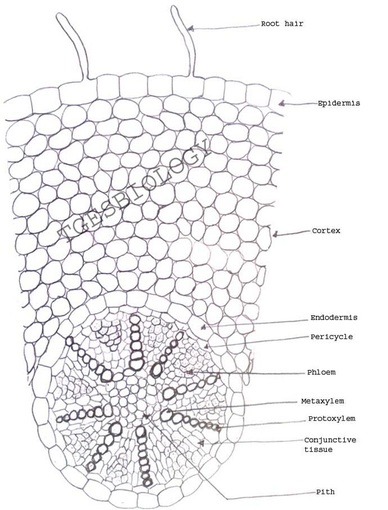
C. Temporary slide preparation of dicot root
Identifying characteristics
Inference: the given specimen is the section of dicot root
- Unicellular hair are present on the epidermis.
- Hypodermis is absent
- Vascular bundles are radial. Xylem and phloem are present on separate radii.
- Xylem and phloem bundles are less than 6.
- Protoxylem lies towards periphery and metaxylem lies towards centre.
Inference: the given specimen is the section of dicot root
T.S of dicot root (for drawing)
|
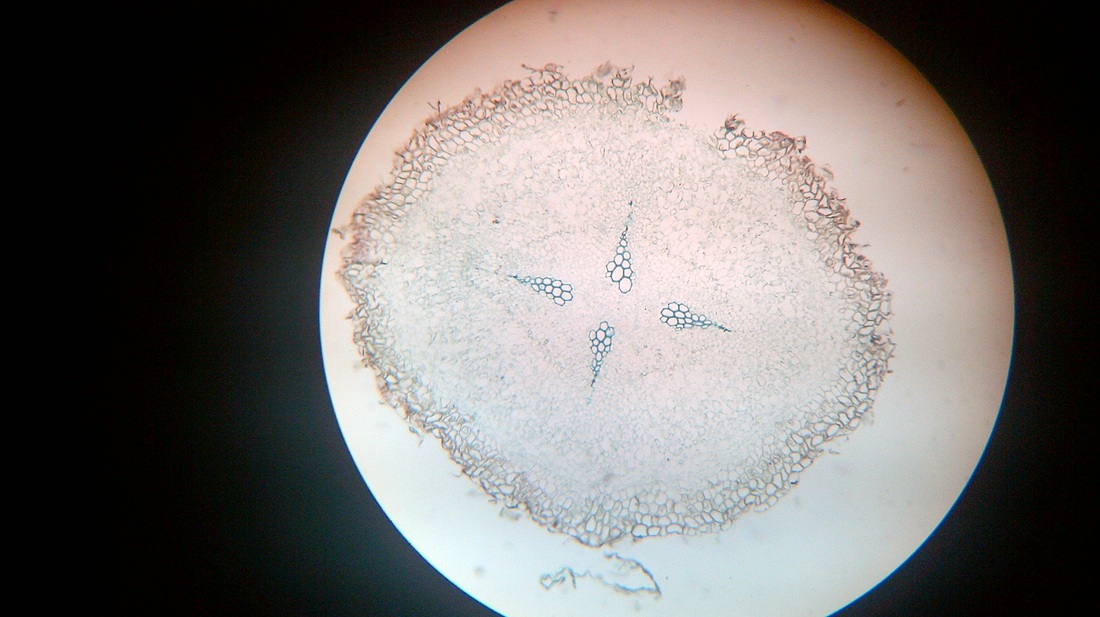
Section of dicot root as seen under the microscope
|
D. Temporary slide preparation of monocot root
Identifying characteristics
Inference: the given specimen is the section of monocot root.
- Unicellular hairs are present on the epidermis.
- Hypodermis is absent
- Vascular bundles are radial. xylem and phloem are present on separate radii.
- Xylem or phloem bundles are more than 5.
- Metaxylem lies towards centre.
Inference: the given specimen is the section of monocot root.
T.S of monocot root (for drawing)
|
|
TEMPORARY SLIDE PREPARATION OF GERMINATING POLLEN GRAINS
Aim: To prepare a temporary slide of germinating pollen grains
Material Required: Petri dish, glass slides, coverslips, microscope, needle, forceps, eye piece graticule, filter paper, pollen culture solution [prepared using boric acid, KNO3, MgSO4, (CaNO3) 2], 40% sucrose solution, flowers with pollen grains( e.g.evergreen/Catharanthus, Hibiscus, Lily etc.).
Material Required: Petri dish, glass slides, coverslips, microscope, needle, forceps, eye piece graticule, filter paper, pollen culture solution [prepared using boric acid, KNO3, MgSO4, (CaNO3) 2], 40% sucrose solution, flowers with pollen grains( e.g.evergreen/Catharanthus, Hibiscus, Lily etc.).
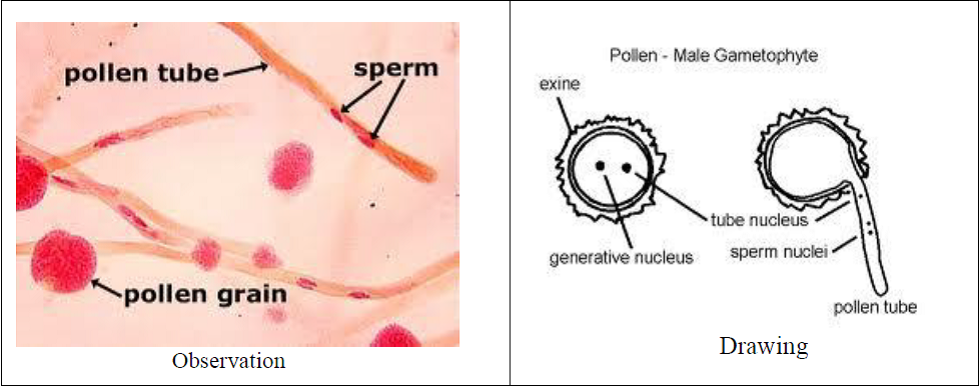
Procedure:
1. Place a filter paper in a Petri dish, moisten the paper with water and replace the lids. These will form chambers in which your slides of germinating pollen can be kept humid.
2. Take 5 cm3 of pollen culture solution in a test tube and make it up to 10 cm3 with 40% sucrose solution. This now contains 20% sucrose.
3. Take two absolutely clean microscope slides and place a drop of medium in the centre of each slide. Label the slides with the names of the flowers you are investigating.
4. Gently rub the point of a mounted needle over the anthers so that pollen falls onto the drop of a culture medium. Transfer any pollen from the needle by tapping the needle against a pair of forceps. Put a coverslip over it gently.
5. Clean the needle thoroughly and repeat step 4 with other flower.
6. Note the time of adding pollen to the medium and place the slides in the Petri dish. Handle the slides with great care so that the drops of pollen medium remain in the centre of the slides.
7. Use a microscope, with x100 magnification and an eyepiece graticule, to observe the slides over the next 15-30 minutes for signs of pollen germination. Between quick observations, turn the microscope lamp off and return the slide to the Petri dish.
Observation:
- Pollen grain are seen with the pollen tubes.
- Some of the pollen grains are non-viable as they are not germinating.

Result:
The viable pollen grains germinate in proper nutrient medium and show variable length of the pollen tubes.
Precautions
The viable pollen grains germinate in proper nutrient medium and show variable length of the pollen tubes.
Precautions
- Dust few pollen grains on the slide to avoid overlapping.
- Label the slides properly for different flowers.
- There should not be any air bubble under the coverslip.
